


Whatever the reason, here are the steps you need to understand. While there are some various lacing patterns and dirt bike hub types, those principles be the same with all of them.
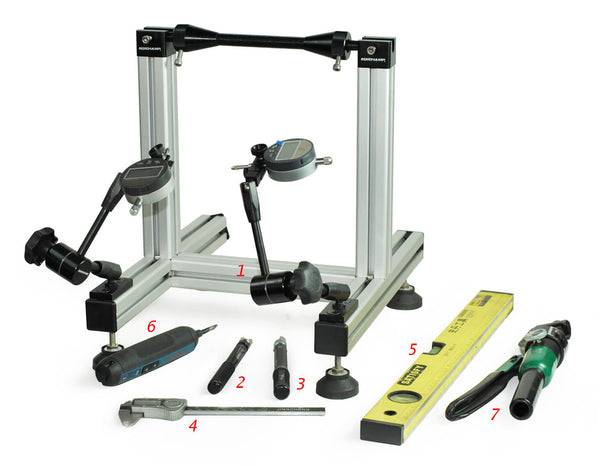
1. Tools Needed
You will certainly require 1.a mxchamp digital wheel truing stand 2. a suitably sized mxchamp spoke wrench 3. a torque spoke wrench 4. a digital caliper 5. a ruler 6. a electric screw driver 7. a set of wire-cutters with a cut-off wheel spokes, helps disassemble the wheel quickly if you are replacing the spokes. 7. a work bench with an old blanket to work on.
2.Examine
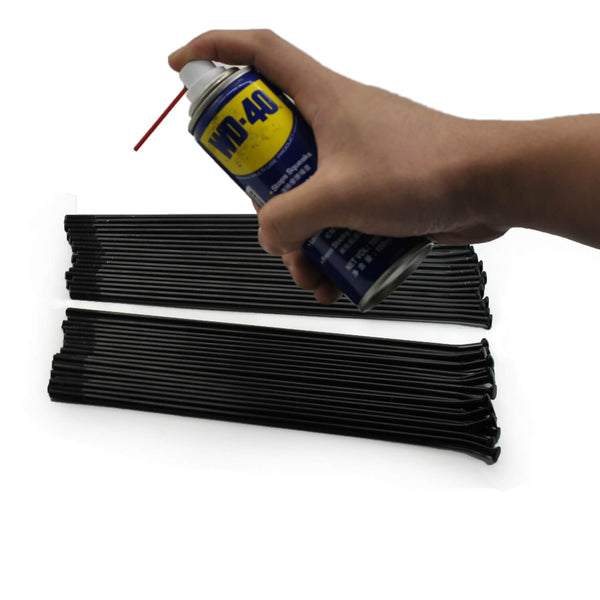
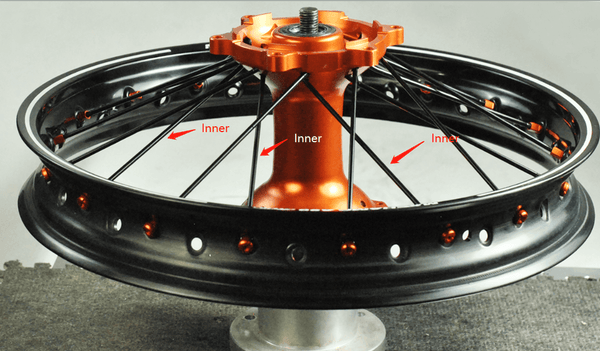
When looking at your wheels, you'll see there are two sorts of spokes. Inner and outer. On wheels that have anisomerous hubs, there are two-short and longer versions of inside(fits inner spokes) and outside(fits outer spokes), Spray anti-seize lubricant (like WD-40) on the thread of spokes will help you truing works more easy when you turn around the nipples.
Before getting to lace up, we suggest taking picture of the wheel or, if you're starting from scratch, find some images of the wheel online. This will assist you know which direction each sort of spokes goes as you start to lace up
3.Offset
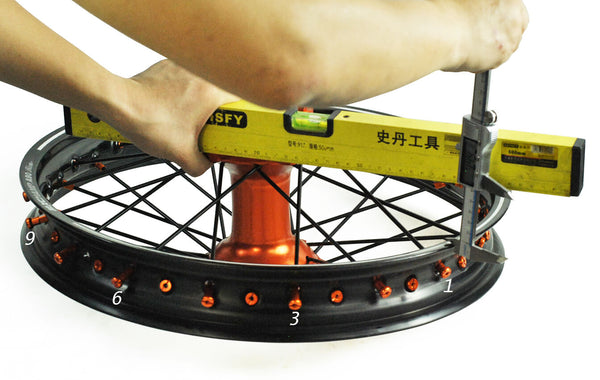
An additional essential step is to measure the offset. Occasionally, rims are not centered on the hub, so you will certainly need to take a couple of measurements. Take a long straightedge and also lay it across the brake disc flange, hub edge or sprocket flange and gauge the distance in between it and edge of the rim. Inspect the dimension at 1,3, 6, 9 and 12 o'clock to figure out any type of bends in the rim. Select the "most popular" measurement and write down. Having a manufacturer service manual truly assists because the offset is listed normally. If you're build a customer-tailored wheel, you might need to do some mathematics to identify the rim to hub offset needed for your dirt bike wheels.
4.Wheel Disassembly
If you are replacing the dirt bike spokes and nipples, you can save much times by cutting the worn-out spokes. Recommend you to use hydraulic wire cutters. Put on safety glass because that the spokes can bounce out of wheel, although leaving the rubber rim strip on while doing this keeps from occurring. If you are simply changing the rim and reusing your original spokes and nipples, you can just take out the nipple and leave the spokes in the hub. This will keep you from doing additional job.
5.Prepping the Hub
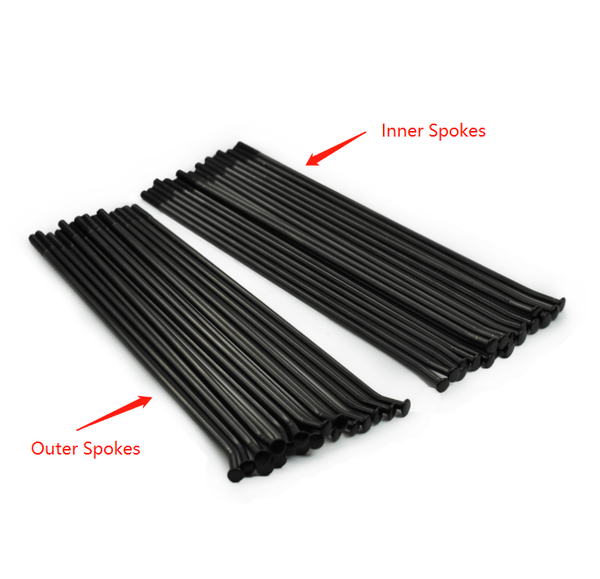
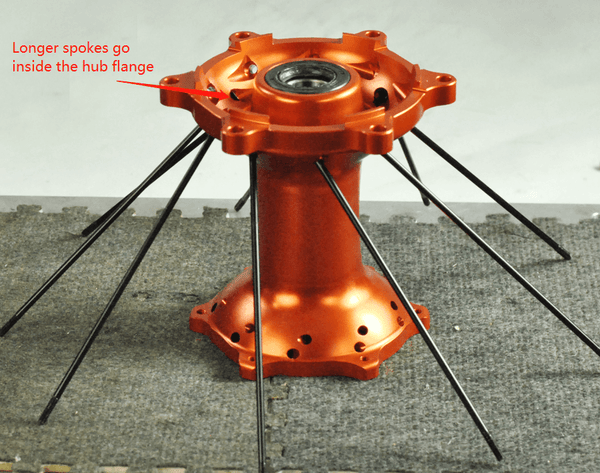
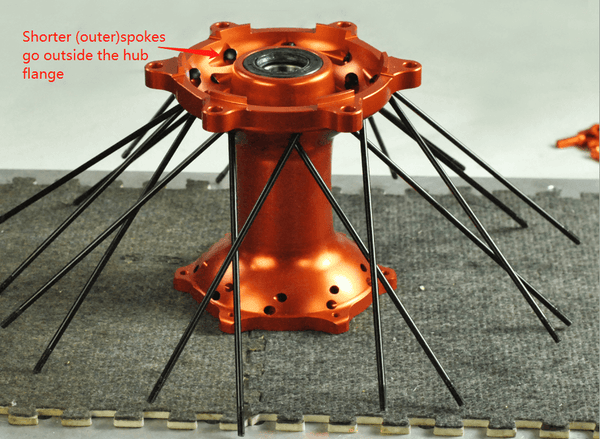
Prepare the hub prior to starting mount spokes into it. Currently is the good time for painting, powder coating or polishing. It is right time to think changing the wheel bearings and seals. It is simple to tell the difference between "inner" and "outer" spokes by taking note of length. Shorter spokes generally go outside the hub flange. Longer spokes generally go inside the hub flange.
Separate your "outer" and "inner" spokes into 4 stacks. If your hub has a big side and small side, be sure to separate the spokes right into 4 stacks-long inside and outsides, and short insides and outsides. Place some anti-seize liquid (WD-40)on the threads of each spoke. This ensures that you will certainly obtain torque sensation in your spoke wrench when you tighten up the wheel. It will also permit you to quickly true or re-tension the wheel in the future if needed.
6.Lacing Up Inner Spokes
Angle the spokes in the proper direction, clockwise or counterclockwise, using your recommendations. Put the rim around the hub and spokes. Use old carpet to work on so absolutely nothing gets scratched as you move it all over. Currently when you take a look at the holes in the rim, it will be extremely obvious which spokes go in which holes. If you're having trouble, poke a nipple with the rim make note of which way it's pointing, this will certainly reveal you which spoke with start with. If you're restoring a wheel with an assymmetrical hub, it is necessary to take note of the rim-to-hub positioning.
As soon as you get the 1st spoke nipple threaded through the rim, repeat through every 3 hole in the rim. Simply work on one side at once-inside right-side spokes into every 3 hole in the right side of the rim, then inside left-side spokes into every 3 opening in the left side of the rim. You will only need to rotate the nipple onto the spokes a few turns. Don't tighten them up way too much because that will make it difficult to finish lace up the wheel. You will certainly tighten the nipple all up together at the end of lace up.
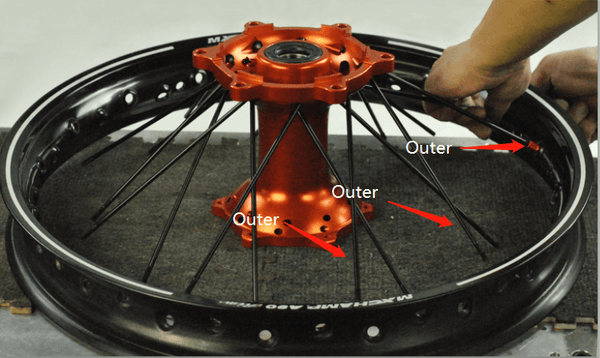
7. Lacing Up Outer Spokes
Next step, you'll put the 1st row of "outer" spokes into one side of the hub. We proposal lacing them one at time to avoid scraping the rim. You will certainly be able to poke a spoke through the hub flange from the within, going outward and after that, using your referrals, turn the nipple onto it via the suitable hole in the hub. Repeat for each 3rd hole on the same side of the rim until the spokes are all in place in one side of the wheel.Then accomplish by lacing the remaining "outer" spokes into the opposite side of the wheel.
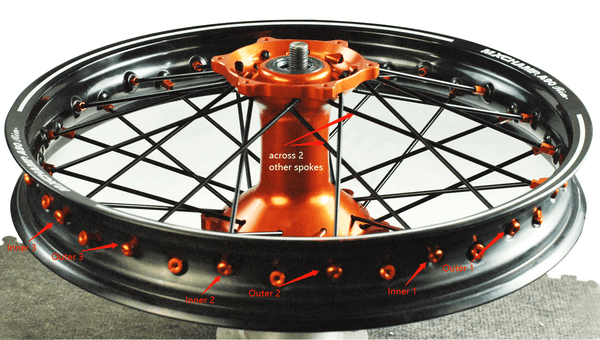
Now your wheel will certainly be completely "loose laced." You need to attention the hub and rim are extremely relaxed and all the spokes nipples ought to be sticking with the rim equally. If you find that there is a lot of stress on one "type" of spokes and none on others, you might have to support and restart, paying close attention to your reference. Keep in mind of the number of one spoke crosses an another spoke. On wheels with balanced hubs, spokes will normally go across 2 other spokes.
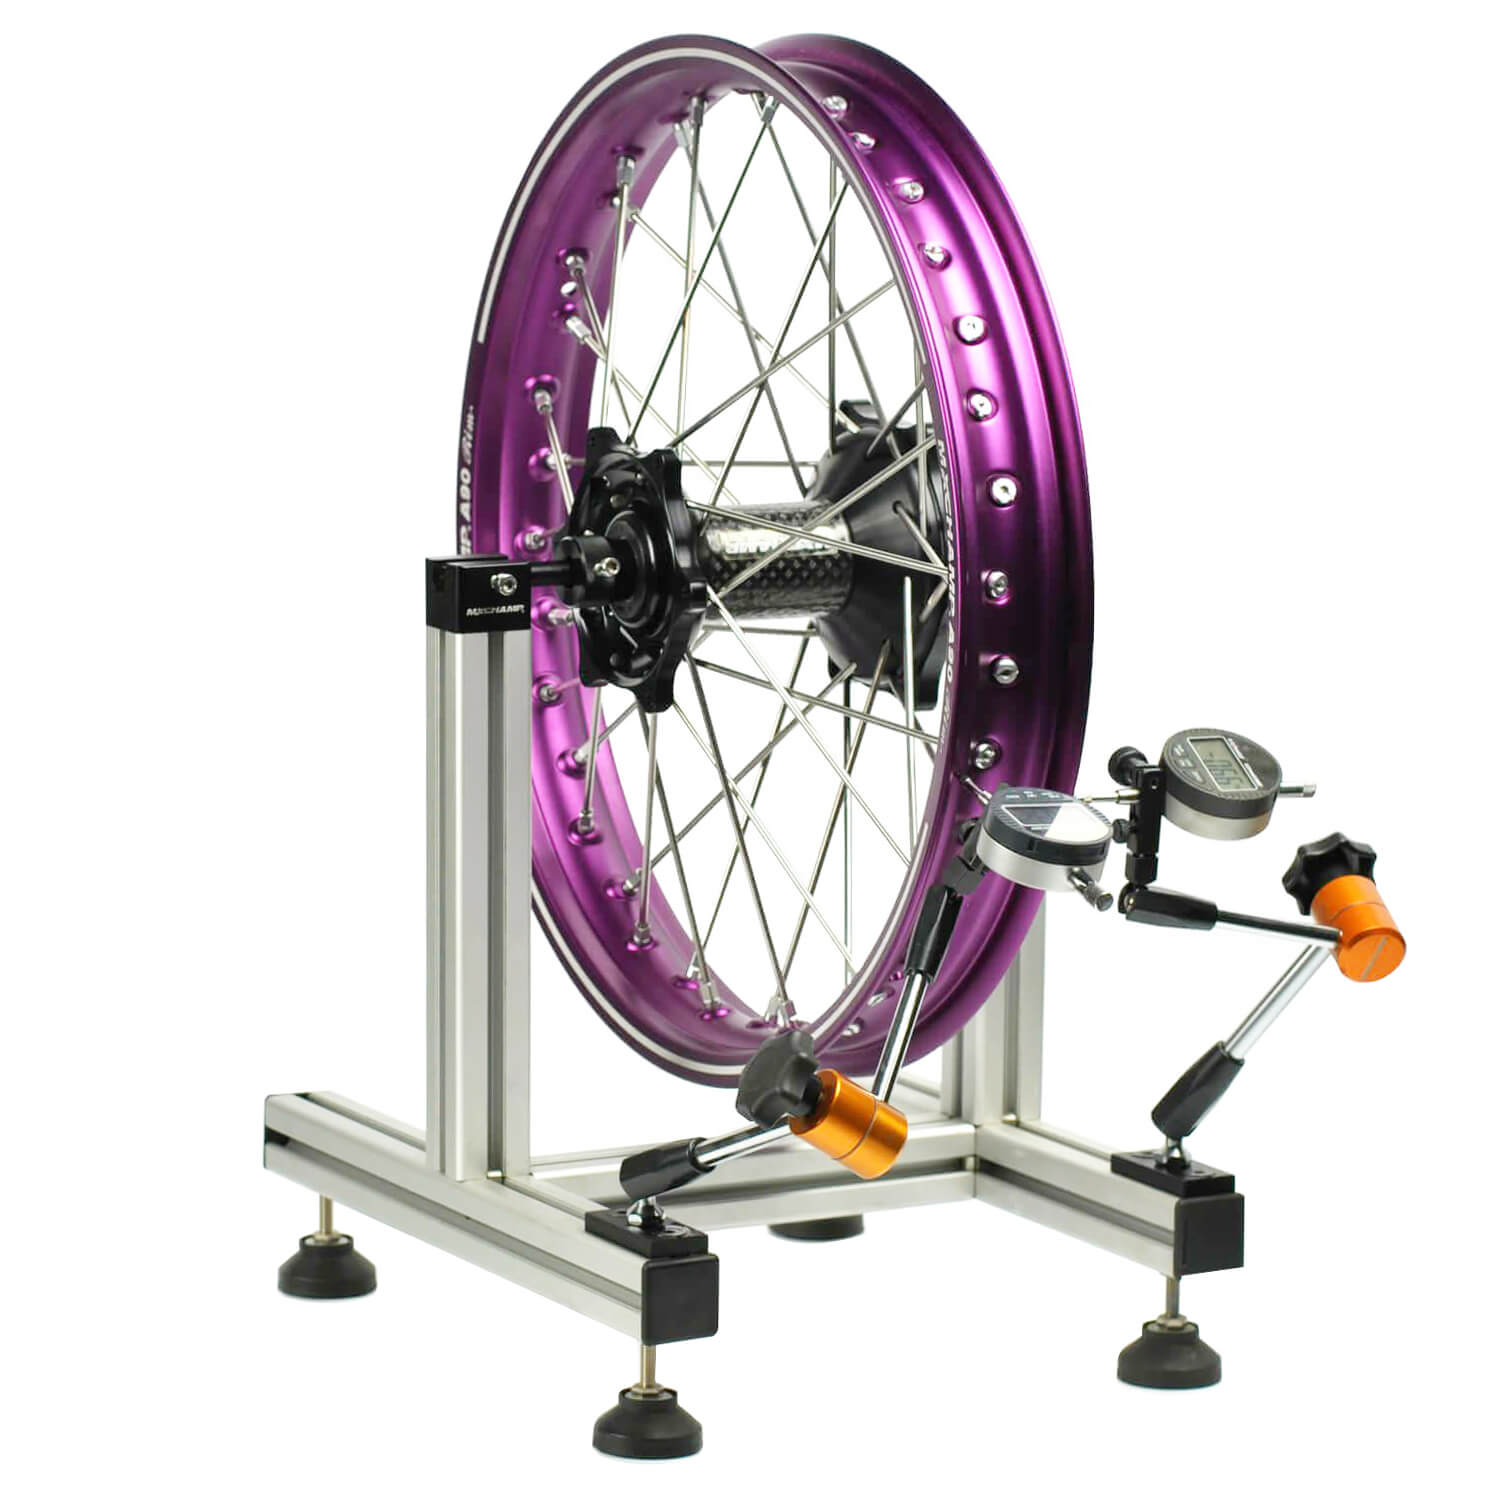
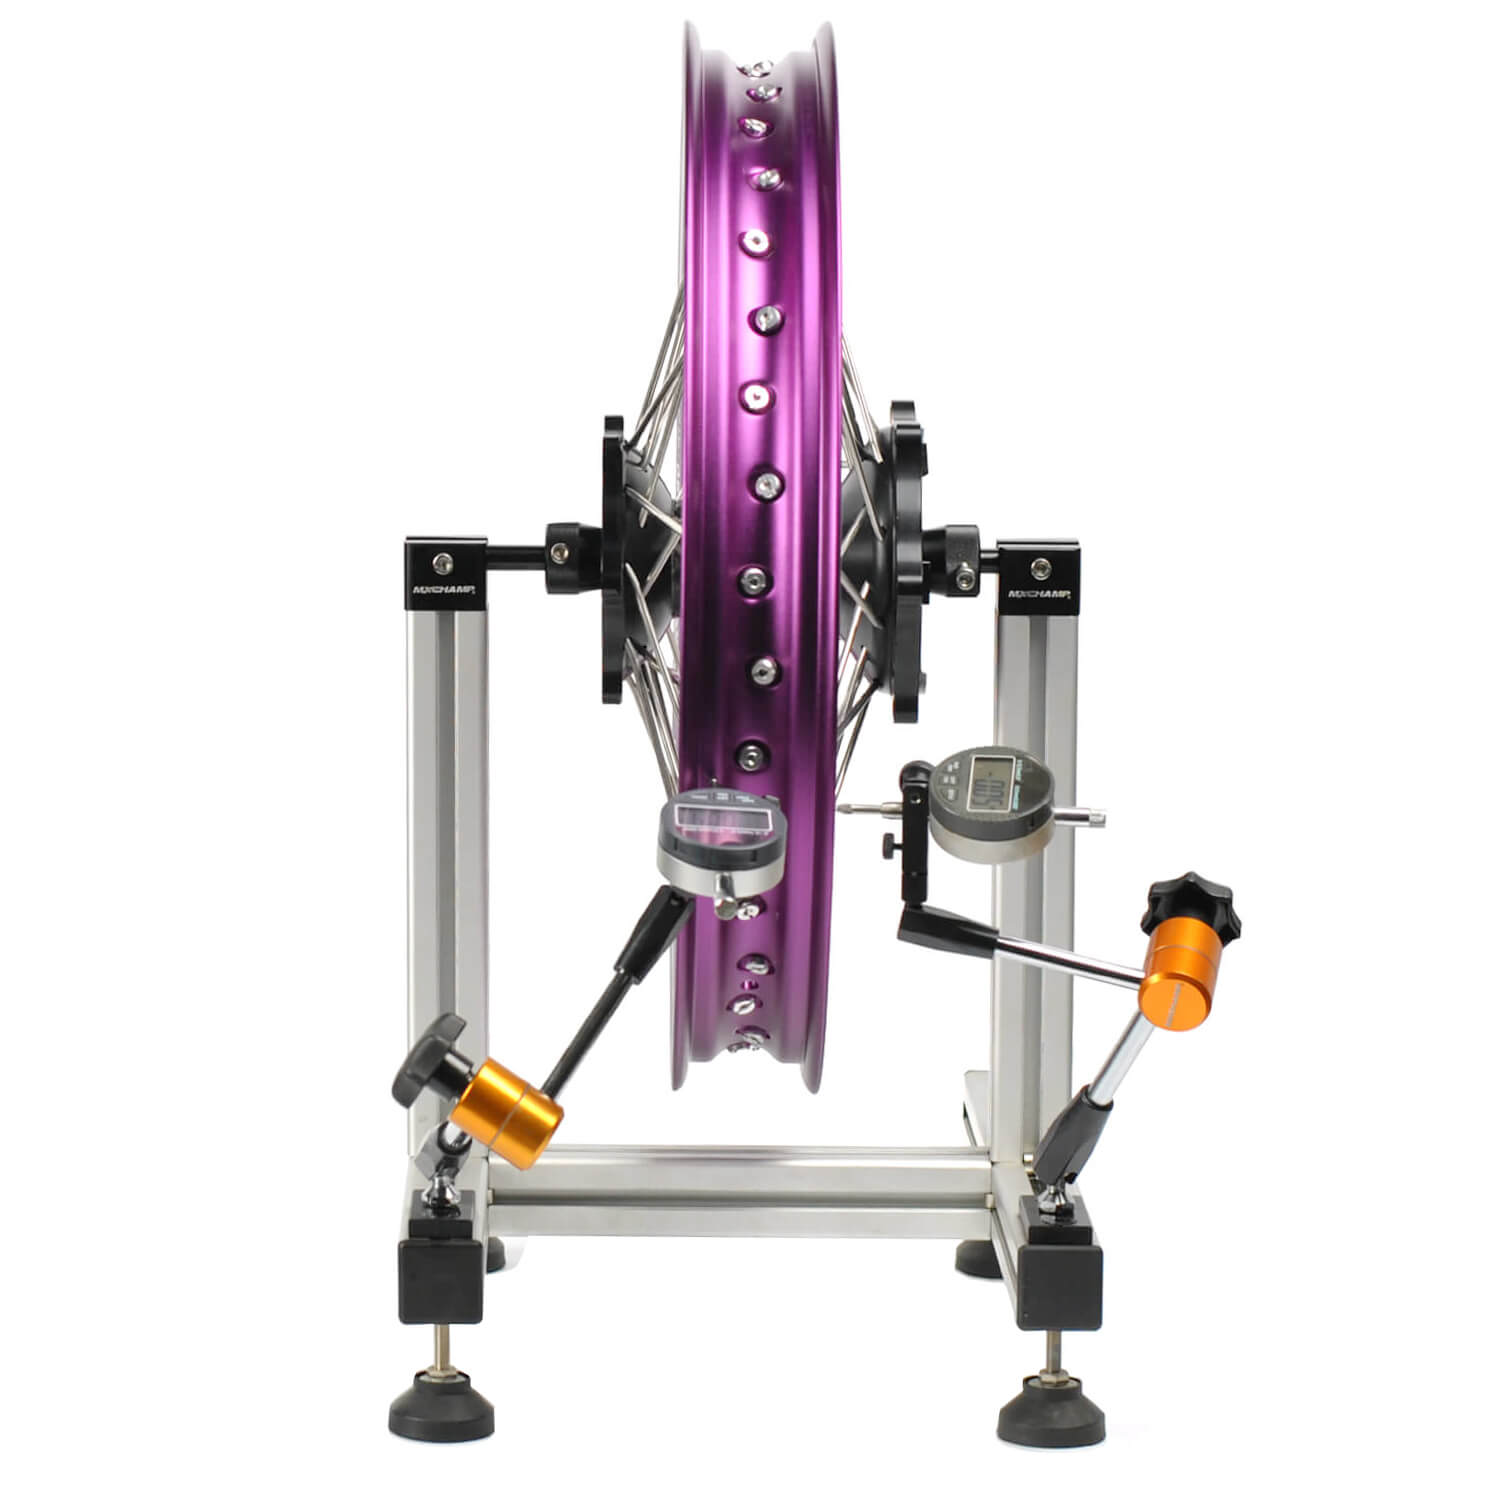
8.Truing Wheels
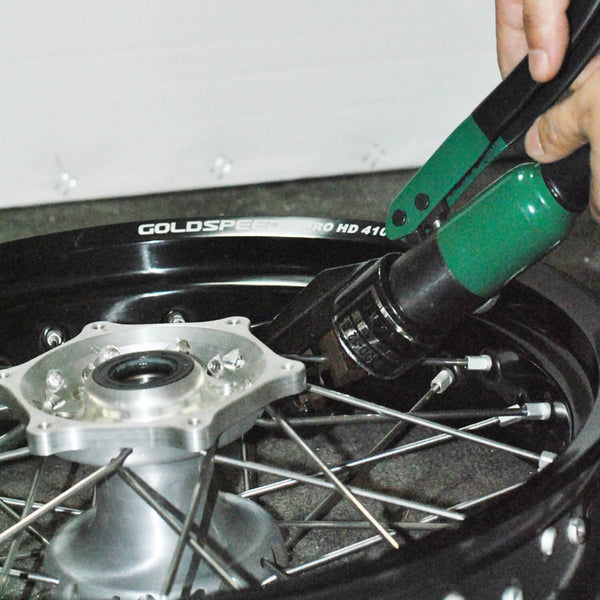
Now you will certainly put the laced up wheel right into your wheel truing stand. Make sure your stand's cones are up against the internal bearings and not the rubber dust seals. Using the valve stem hole as a start point, screw driver tighten up the nipple equal right around, leaving about 0.125" to 0.25" of threads showing on every spokes. This ought to take most of the slack out of the wheel. Continue screw driver tightening the nipple simply a 1/4 rotate each time until they are all just barely close-fitting.
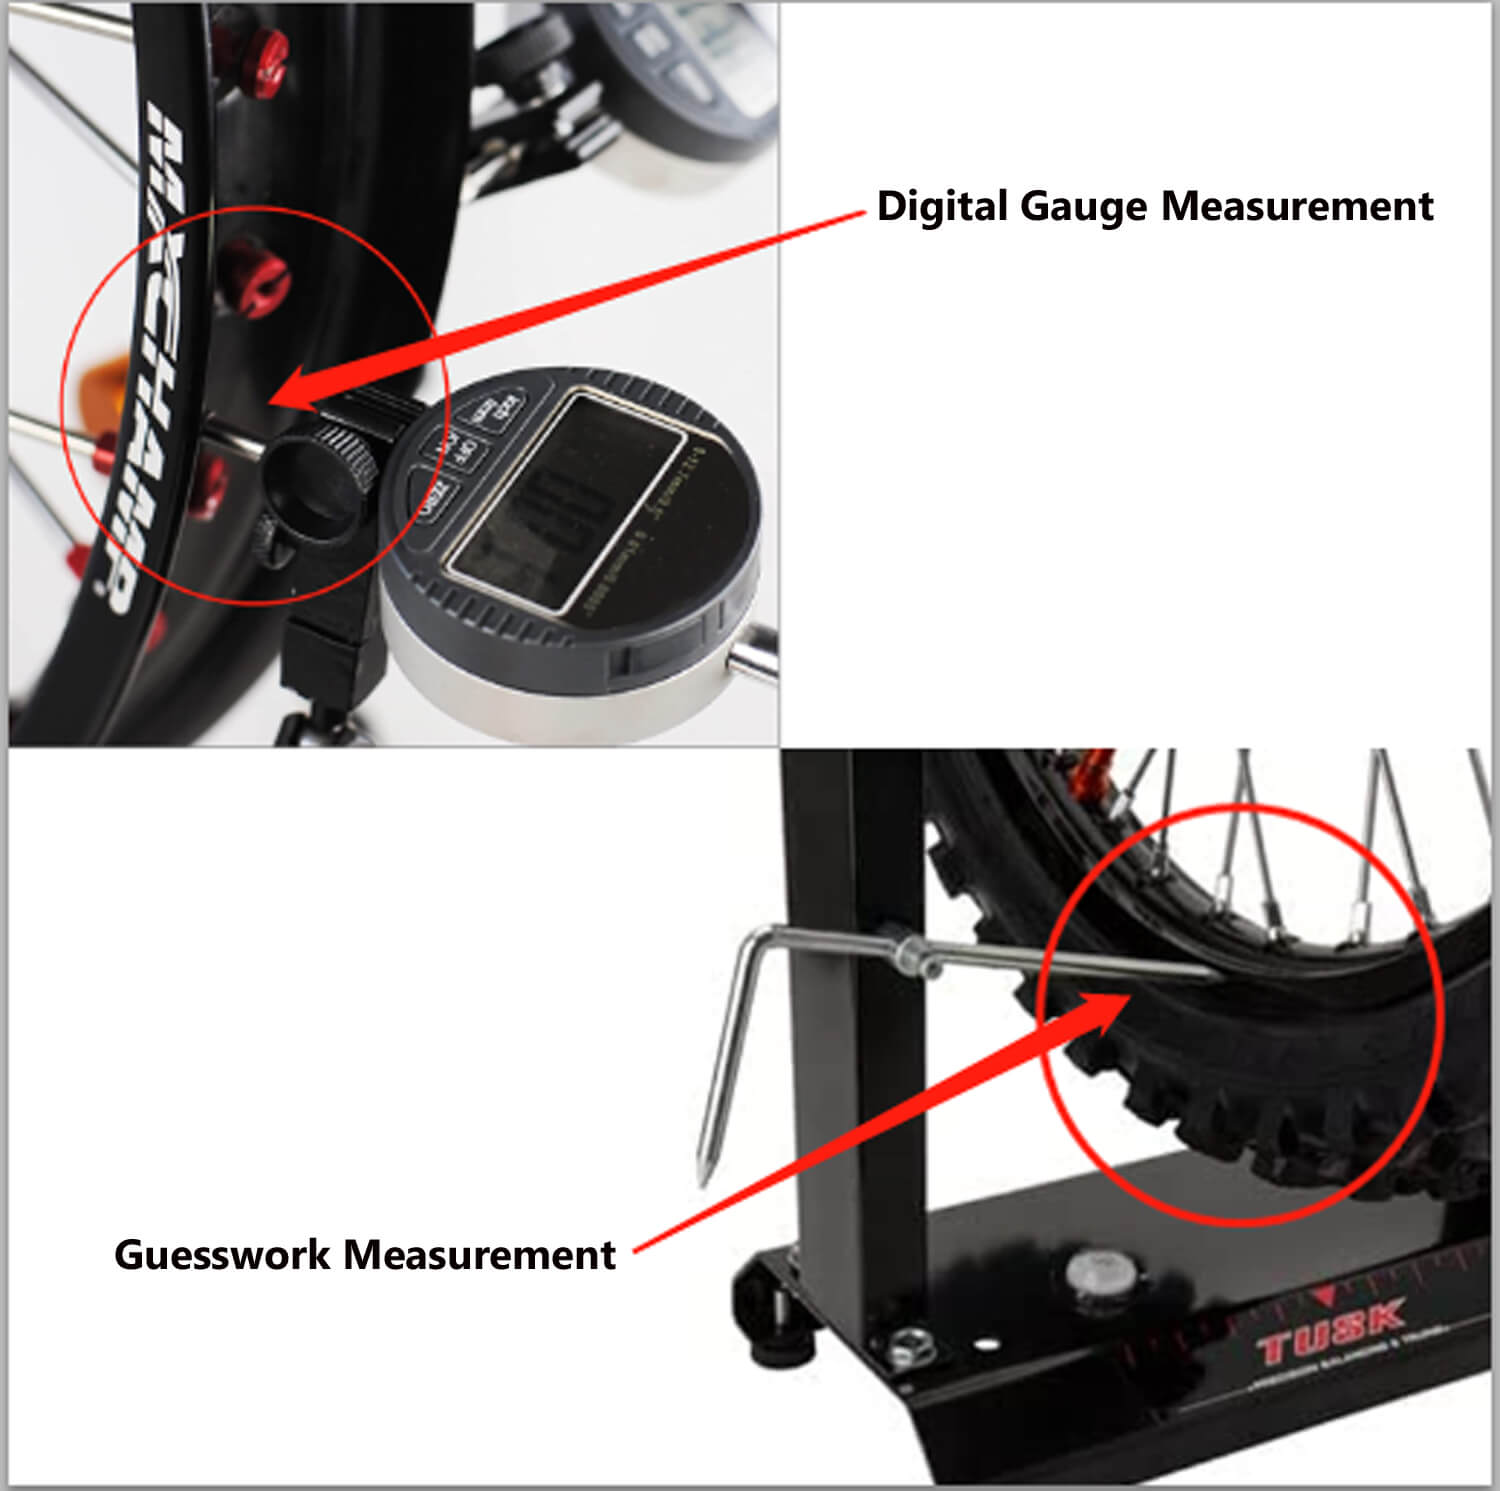
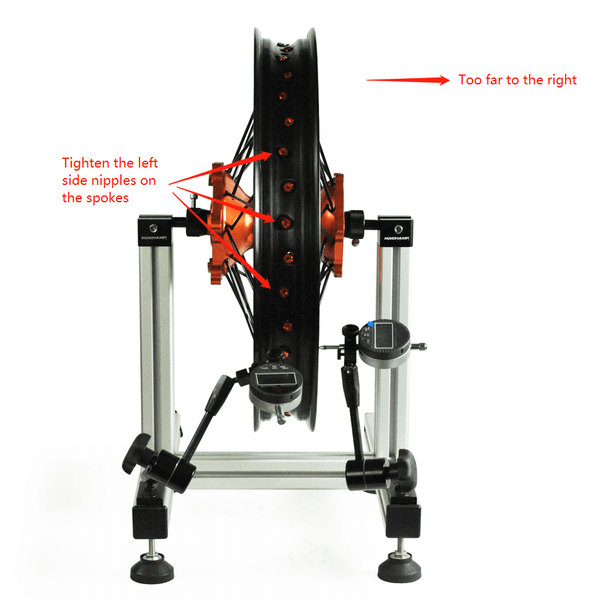
Using the measurement pointer on your digital wheel truing stand, check the wheel for side-to-side wobble and up-and-down hop. If the rim is too far to the right, by hand, loosen the spokes on the right and tighten the ones on the left of that particular area. Usually just two spokes on each side of the wheel will do the trick. For areas that hop and up and down, the same principle applies. If the rim is too low, tighten the nipples evenly on both sides of the wheel to draw that area closer to the hub. This will also include adjusting four or more nipples. If it is too high, loosen the nipples in that area. The straighter you can get the wheel by hand up front, the easier tensioning it will be in the next step.
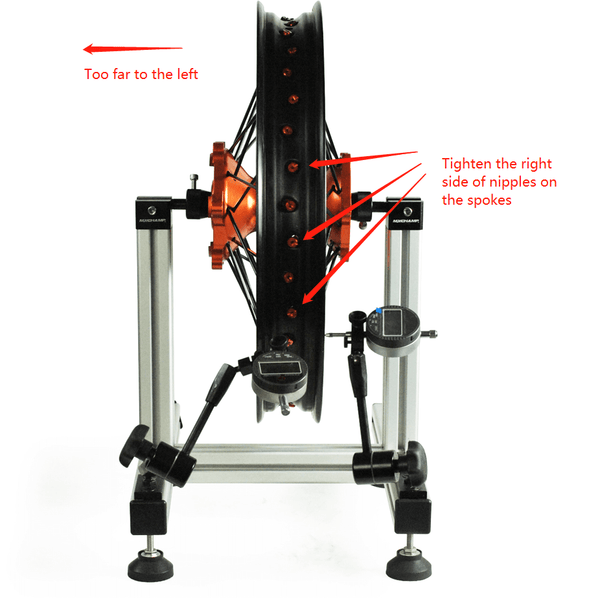
If the rim is too far to the right in a particular area, tighten the spoke nipples on the left and loosen the ones on the right.
If the rim is too low in a particular area, tighten at least four spokes in that spot to bring the rim closer to the hub. If it is too high, loosen these spokes, moving it away from the hub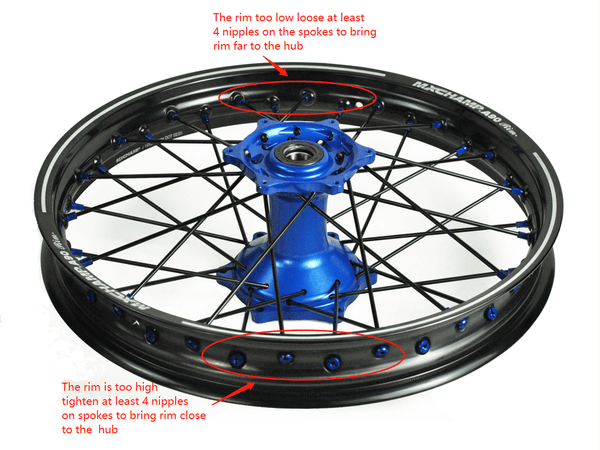
9.Tensioning and Offset
Tensioning is primarily getting the wheel back to that tight-as-a-dirt bike manufacture specification Japanese Wire Wheel Balancing Standard[JIS-D4215] The method is to tighten up the nipple equal completely around, frequently examine for wobble and hop on every lap around the wheel, utilizing the valve stem hole as a start point. This can certainly bore but this is where you are creating strength into your wheel. Usually tighten up the nipples simply a quarter turn each time per lap around the wheel up until it's tight. Your dirt bike manual may list the torque setting your nipple must be at, which of course needs a torque spoke wrench. we recommend you set up torque spoke wrench on 3.5-4.0 N.m.(or 35~40 lbs.inch) This is likewise the time you should be inspecting the offset.
10. Last Steps
When bringing the wheel to last stress. The best practice is to go "by feeling" with a torque spoke wrench, paying close attention to maintaining the rim straight and hop-free. You may intend to tap on the spokes of the various other wheel on your bike, or even a friend's bike to hear the correct pitch of an effectively tensioned wheel. On a loose wheel, the spokes will certainly generate a reduced as well as dull tone. A correctly tensioned wheel will have a wonderful "ping" to them. A wheel that is overtightened can possibly fracture the hub or start to pull the nipple areas via the rim
Make sure to erode any type of spokes that might be poking through the nipple area given that the inner tube would or else be pierced by it. Set up a brand-new rubber rim strip, dirt bike tires and tube and enjoy your new wheel!
Tensioning Bonus Tips
Take into consideration the size and weight of the bike. Bigger powerful effective motorbikes like Harley bikes or cruisers generally have wheels with fatter spokes that are really tight. Smaller, older bikes that are lighter and also have less powerful engines usually will have wheels with thinner spokes and also smaller nipples that do not call for the same stress. Dirt bikes are an exception given that they are light-weight but require very strong wheels, so they normally have much heavier duty spokes and nipples under relatively higher stress.
The concept below is that a spoked wheel should be under adequate tension to hold up against the optimum tension the wheel is expected to handle.Too loose and intermittent stress each spoke the wheel goes around will certainly create work-hardening and ultimate failure of the spokes. Excessive stress places excessive strain on the hub and rim. Most of the time, an inexperienced wheel builder has a tendency to leave a wheel as well loose versus overtightening. If you are intending to truing wheels more than one wheel sometimes, it may deserve purchasing a torque spoke wrench to assist increase your wheelsmithing ability of identifying the proper stress.
The best tool to have when truing dirt bike wheels is patience. It may take you a few hours to finish your very first wheel. If you're really feeling depressed, walk out and you'll return back a clear head. As soon as you figure it out, you will find yourself wishing to lace up and truing a fresh set of wheels for every old dirt bike you see.