


Technical Tips
10 Things You Need to Know About the Dirt Bike Wheels
1.Dirt Bike Rims
It doesn't matter whether the spokes are tightened up correctly or not, The dirt dike rims do bend. There is no alternative for a quality wheel rim. The distinction in between a good quality rim can be just as a flat spot or as much as a broken rim. Bad quality motocross rims generally crack at the weld.
2.Dirt Bike Hubs
OEM stock hubs versus aftermarket-who takes the cake? At the hi-end of the sport, most of Pro racers utilize either works or aftermarket hubs, most of which are billet. Forged hubs are solid and reliable, however have a tendency to be a little heavier than casting hubs. Casting allows the designer (or maker) to choose the proper measurement without needing to trim the design out of a solid chunk of metal. On a side note, the question of "declining" (cutting product off the hub) the stock hubs to looks like the factory appearance typically shows up. We do not recommend this.
3.Bearings and Seals
Bearings are an often-overlooked aspect of race performance. Used, galled or grabbed bearings reduce wheel spin, boost drag and sway at speed. Replacing wheel bearings at regular intervals (at least once a year) is an inexpensive service that pays dividends.
4.Suspension
The method you set up your suspension can effect the lifespan of your wheels. Stock wheels are built to rigorous standards- with the understanding that casing leaps, flat touchdown or plowing into a downed bike can exceed the limits of light weight aluminum rims, carbon steel stock spokes and casting hubs. Properly set-up suspension can increase the life expectancy of your wheels.
6. Wheel Rim Locks
Some riders commonly ask the number of rim locks to make use of. Rim locks quit the tire from rotating on the rim. Front wheels just require one rim lock. For back wheels, the number can vary depending upon horse power, riding circumstance and air-pressure choose. Big engine bikes (450cc or up) can warrant two rim locks because of the number of wheel spin and torque. Running low air pressure would be an additional reason for 2 rim locks. If your rim just has one hole, you should pierce a 2nd hole; nevertheless, we suggest you calling a good motorcycle wheel-service store such as wheelmaster for this treatment.
6. Dirt Bike Spokes and Nipples
Typically, OEM stock spokes and nipple are not bad quality; however, KTM, Husqvarna & GasGas had quality issues with their front and rear spokes. Changing spokes can run anywhere from $50 to $200 per wheel. Similar to any type of dirt bike parts, spokes wear out. They extend over time, break in crashes and suffer from absence of tightening or over-tightening. If you do not examine your spokes at fixed period, like before every race, you endanger the structural integrity of the wheel itself. If you over-tighten the spokes, you can stress them enough to break. The exact same is true for nipples. We have seen racers round off their nipples by trying to tighten up spokes that have actually stretched far reason. We have actually seen racer whose nipples are so loosened that they have vanished down into the rim. We have seen nipple that are so grab on the spoke that the only method to disassemble the wheel is to cut the spokes off.
Maximize your wheelset strength and ensure that all spoke nipples are torqued to the proper specs. Refer to your owner’s manual for each model’s proper spoke torque setting. Unusually, we recommend you set up the torque spoke wrench 3.5-4.0N.m(35-40 lbs.inch) Overtightened nipples/spokes can generate a weak wheel set and you’ll be more likely to break spokes or bend a wheel rims.
7. Too Much Maintenance
Think about your spokes as the strings on a guitar. The strings can be strummed to play a melodious tune when they are tensioned appropriately. A loose string on a guitar provides a false note. Many racer assume that inspecting their spokes means tightening them. Not true. Examining them means analyzing their state of melody. The highest cause of broken spokes and also eventually broken wheels is riders who turn each spoke a little each time they ride. Doing this melodies every spokes to an "F-sharp" generates the risk of having the threaded end of the spoke poke through the nipple into the internal tube.
8.Torque Spoke Wrench
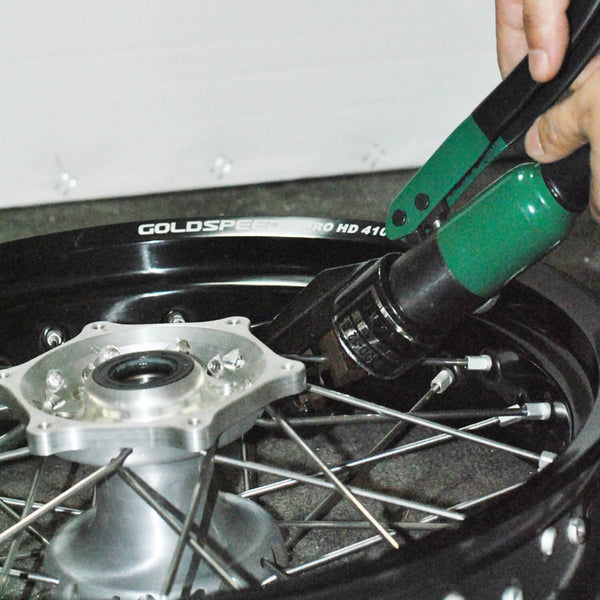
This is one of key tools that every racer should to ready. A spoke torque wrench is the most effective means to ensure the spokes are serviced correctly and set to the right torque specs. For OEM stock wheels, refer to the owner's manual for these torque specs.We recommend to set up the torque spoke wrench 3.5-4.0 N.m(35-40 lbs.inch) and turn around each nipple till you heard "click" sound.
9.Preserve
If you choose to run aftermarket billet hubs, there are a few points to note. These hubs are usually made from aluminun billet and than anodized. The back hub can get really hot from thermal disbursed from the back brake. When cleaning your bike after riding, it is right way only use water till whole bike cools. The chemicals in cleansers will certainly stain or streak the hubs when they are hot. Stock hubs will typically get tarnished despite what you do, particularly the back, as things like chain lube will certainly get onto the hub when it's hot. Likewise, when you wash your bike, stay away of spraying straight into the location of the wheel bearings. For a deep cleaning, take the wheels off the bike and also use compressed air to clear up any kind of wetness in the area of the bearings.
10. Factory Stock Hubs
Factory racing teams can use up to 10 sets of hubs per racer per season. Relying on the variety of hrs they were ridden and the circumstances that the hubs were made use of in, the used hubs might be transferred to the racer's practice bikes the next year. Most of racing teams utilize new hubs every season for safety reason.
10 Steps to Lace Up and Truing Dirt Bike Wheels
There are some reasons why you want to know how to lace up dirt bike wheels. Maybe you're restoring an old dirt bike or fixing damage to your bike after a brutal ride. Maybe you're building a customer-tailored wheels and want to update rim size and hub combo that's not available.
Whatever the reason, here are the steps you need to understand. While there are some various lacing patterns and dirt bike hub types, those principles be the same with all of them.
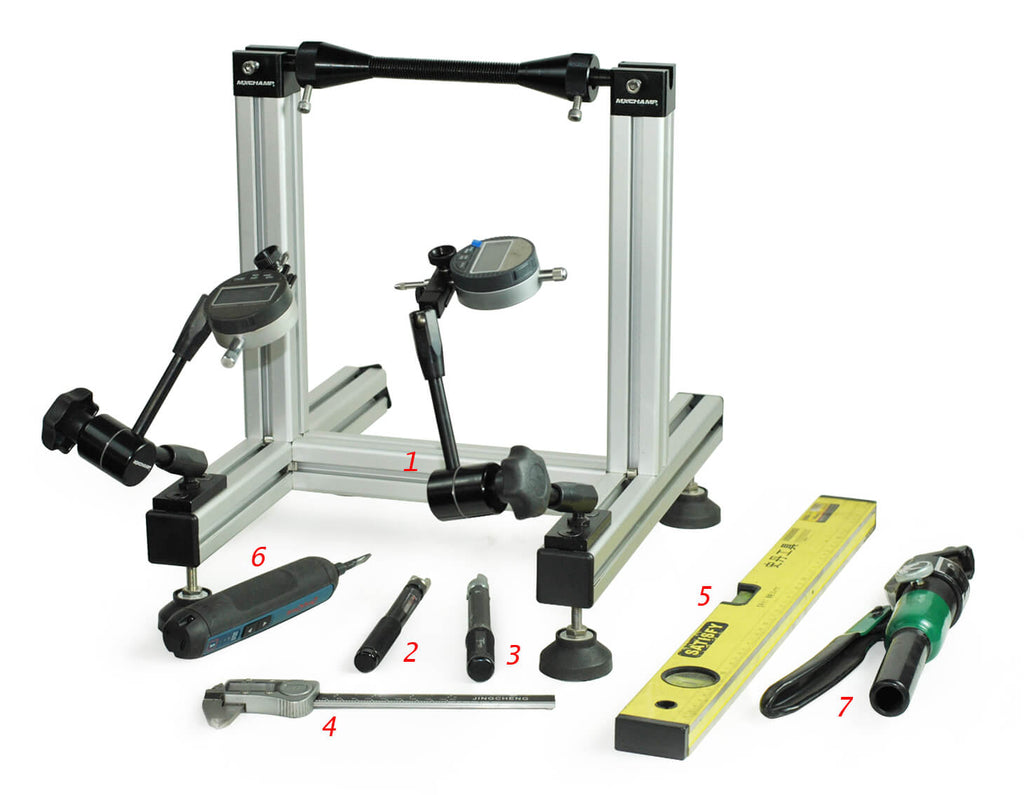
1. Tools Needed
You will certainly require a 1.mxchamp digital wheel truing stand, 2. a suitably sized mxchamp spoke wrench, 3. a torque spoke wrench 4. a digital caliper, 5. a ruler 6. a electric screw driver 7. a set of wire-cutters with a cut-off wheel spokes helps disassemble the wheel quickly if you are replacing the spokes. 7. a work bench with an old blanket to work on.
2.Examine
When looking at your wheels, you'll see there are two sorts of spokes. Inner and outer. On wheels that have anisomerous hubs, there are four-short and longer versions of inside(fit for inner spokes) and outside(fit for outer spokes), Put some lubricant (like WD-40) on the thread of spokes will help you truing works more easy when you turn around the nipples.

Before getting to lace up, we suggest taking picture of the wheel or, if you're starting from scratch, find some images of the wheel online. This will assist you know which direction each sort of spokes goes as you start to lace up
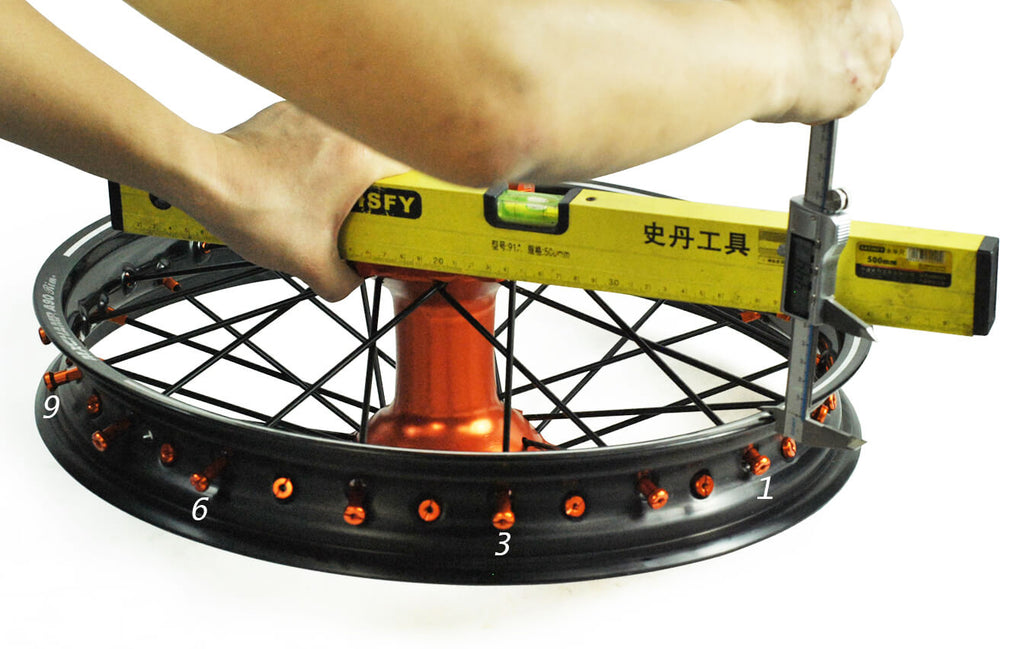
3.Offset
An additional essential step is to measure the offset. Occasionally rims are not centered on the hub, so you will certainly need to take a couple of measurements.
Take a long straightedge and also lay it across the brake disc flange, hub edge or sprocket flange and gauge the distance in between it and edge of the rim. Inspect the dimension at 3, 6, 9 and 12 o'clock to figure out any type of bends in the rim. Select the "most popular" measurement and write down. Having a manufacturer service manual truly assists because the offset is listed normally. If you're build a customer-tailored wheel, you might need to do some mathematics to identify the rim to hub offset needed for your dirt bike.
4.Wheel Disassembly
If you are replacing the dirt bike spokes and nipples, you can save much times by cutting the worn-out spokes. Recommend you to use hydraulic wire cutters. Put on safety glass because that the spokes can bounce out of wheel, although leaving the rubber rim strip on while doing this keeps from occurring. If you are simply changing the rim and reusing your original spokes and nipples, you can just take out the nipple and leave the spokes in the hub. This will keep you from doing additional job.
5.Prepping the Hub
Prepare the hub prior to starting mount spokes into it. Currently is the good time for painting, powder coating or polishing. It is right time to think changing the wheel bearings and seals.
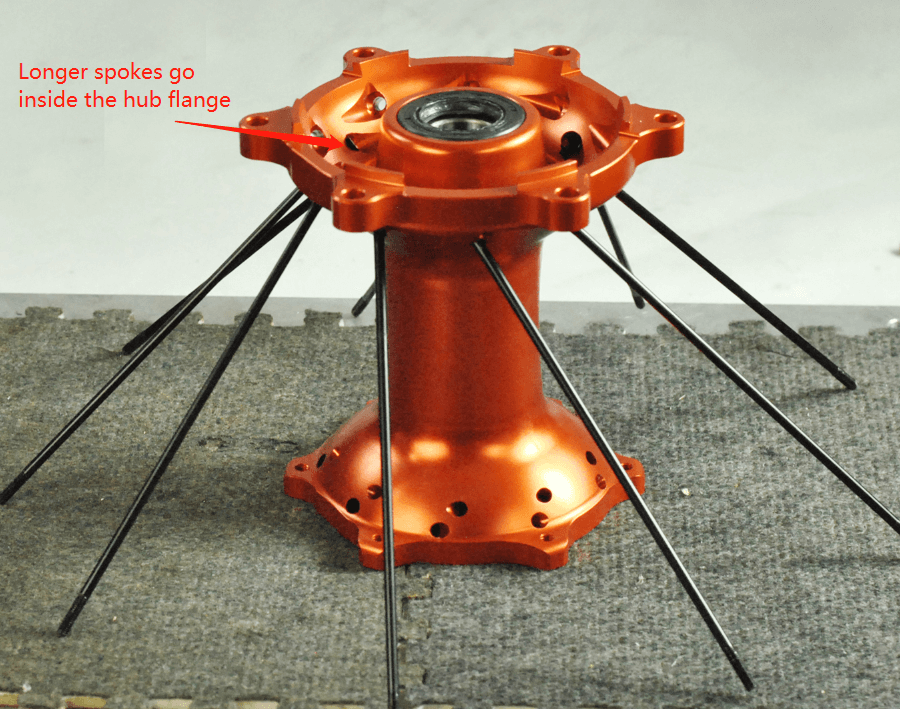
It is simple to tell the difference between "inner" and "outer" spokes by taking note of length. Shorter spokes generally go outside the hub flange. Longer spokes generally go inside the hub flange.

Separate your "outer" and "inner" spokes into 2 stacks. If your hub has a big side and small side, be sure to separate the spokes right into 4 stacks-long inside and outsides, and short insides and outsides. Place some anti-seize liquid (WD-40)on the threads of each spoke. This ensures that you will certainly obtain torque sensation in your spoke wrench when you tighten up the wheel. It will also permit you to quickly true or re-tension the wheel in the future if needed.
6.Lacing Up Inner Spokes
Angle the spokes in the proper direction, clockwise or counterclockwise, using your recommendations. Put the rim around the hub and spokes. Use old carpet to work on so absolutely nothing gets scratched as you move it all over. Currently when you take a look at the holes in the rim, it will be extremely obvious which spokes go in which holes. If you're having trouble, poke a nipple with the rim make note of which way it's pointing, this will certainly reveal you which spoke with start with. If you're restoring a wheel with an assymmetrical hub, it is necessary to take note of the rim-to-hub positioning.
As soon as you get the 1st spoke nipple threaded through the rim, repeat through every 3 hole in the rim. Simply work on one side at once-inside right-side spokes into every 3 hole in the right side of the rim, then inside left-side spokes into every 3 opening in the left side of the rim. You will only need to rotate the nipple onto the spokes a few turns. Don't tighten them up way too much because that will make it difficult to finish lace up the wheel. You will certainly tighten the nipple all up together at the end of lace up.
7. Lacing Up Outer Spokes

Next step, you'll put the 1st row of "outer" spokes into one side of the hub. We proposal lacing them one at time to avoid scraping the rim. You will certainly be able to poke a spoke through the hub flange from the within, going outward and after that, using your referrals, turn the nipple onto it via the suitable hole in the hub. Repeat for each 3rd hole on the same side of the rim until the spokes are all in place in one side of the wheel.Then accomplish by lacing the remaining "outer" spokes into the opposite side of the wheel.
Now your wheel will certainly be completely "loose laced." You need to attention the hub and rim are extremely relaxed and all the spokes nipples ought to be sticking with the rim equally. If you find that there is a lot of stress on one "type" of spokes and none on others, you might have to support and restart, paying close attention to your reference. Keep in mind of the number of one spoke crosses an another spoke. On wheels with balanced hubs, spokes will normally go across 2 other spokes.
8.Truing
Now you will certainly put the laced up wheel right into your wheel truing stand. Make sure your stand's cones are up against the internal bearings and not the rubber dust seals. Using the valve stem hole as a start point, screw driver tighten up the nipple equal right around, leaving about 0.125" to 0.25" of threads showing on every spokes. This ought to take most of the slack out of the wheel. Continue screw driver tightening the nipple simply a 1/4 rotate each time until they are all just barely close-fitting.
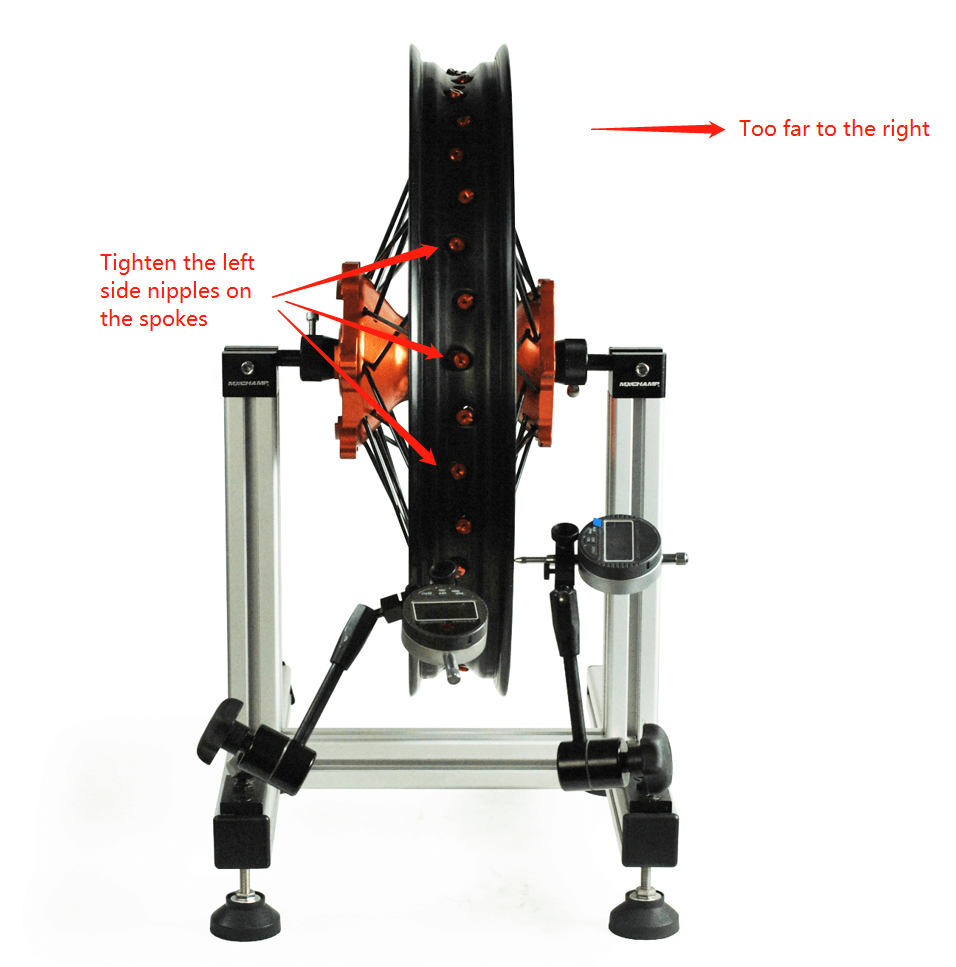
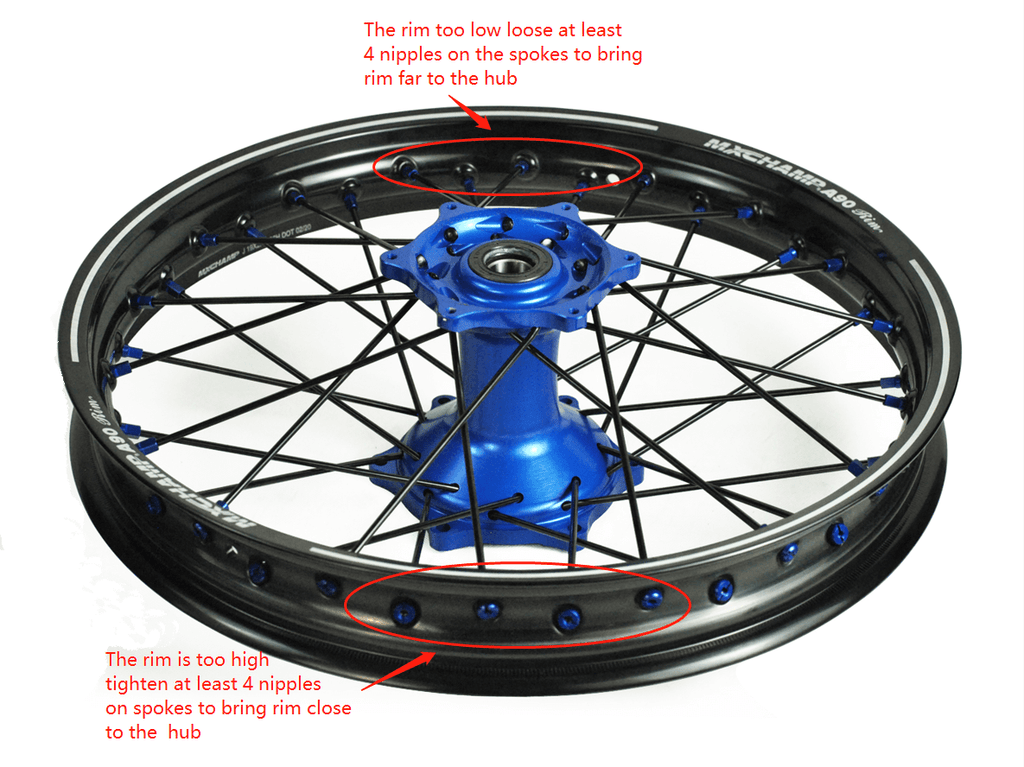
Using the measurement pointer on your truing stand, check the wheel for side-to-side wobble and up-and-down hop. If the rim is too far to the right, by hand, loosen the spokes on the right and tighten the ones on the left of that particular area. Usually just two spokes on each side of the wheel will do the trick. For areas that hop and up and down, the same principle applies. If the rim is too low, tighten the nipples evenly on both sides of the wheel to draw that area closer to the hub. This will also include adjusting four or more nipples. If it is too high, loosen the nipples in that area. The straighter you can get the wheel by hand up front, the easier tensioning it will be in the next step.

If the rim is too far to the right in a particular area, tighten the spoke nipples on the left and loosen the ones on the right.
If the rim is too low in a particular area, tighten at least four spokes in that spot to bring the rim closer to the hub. If it is too high, loosen these spokes, moving it away from the hub
9.Tensioning and Offset
Tensioning is primarily getting the wheel back to that tight-as-a-dirt bike manufacture specification Japanese Wire Wheel Balancing Stand(JIS-D4215) The method is to tighten up the nipple equal completely around, frequently examine for wobble and hop on every lap around the wheel, utilizing the valve stem hole as a start point. This can certainly bore but this is where you are creating strength into your wheel. Usually tighten up the nipples simply a quarter turn each time per lap around the wheel up until it's tight. Your bike manual may list the torque setting your nipple must be at, which of course needs a torque spoke wrench. we recommend you set up torque spoke wrench on 3.5-4.0 N.m.(or 35~40 lbs.inch) This is likewise the time you should be inspecting the offset.
10. Last Steps
When bringing the wheel to last stress. The best practice is to go "by feeling" with a torque spoke wrench, paying close attention to maintaining the rim straight and hop-free. You may intend to tap on the spokes of the various other wheel on your bike, or even a friend's bike to hear the correct pitch of an effectively tensioned wheel. On a loose wheel, the spokes will certainly generate a reduced as well as dull tone. A correctly tensioned wheel will have a wonderful "ping" to them. A wheel that is overtightened can possibly fracture the center or start to pull the nipple areas via the rim
Make sure to erode any type of spokes that might be poking through the nipple area given that the inner tube would or else be pierced by it. Set up a brand-new rubber rim strip, dirt bike tires and tube and also enjoy your new wheel!
Tensioning Bonus Tips
Take into consideration the size and weight of the bike. Bigger powerful effective motorbikes like Harley bikes or cruisers generally have wheels with fatter spokes that are really tight. Smaller, older bikes that are lighter and also have less powerful engines usually will have wheels with thinner spokes and also smaller nipples that do not call for the same stress. Dirt bikes are an exception given that they are light-weight but require very strong wheels, so they normally have much heavier duty spokes and nipples under relatively higher stress.
The concept below is that a spoked wheel should be under adequate tension to hold up against the optimum tension the wheel is expected to handle.Too loose and intermittent stress each spoke the wheel goes around will certainly create work-hardening and ultimate failure of the spokes. Excessive stress places excessive strain on the hub and rim. Most of the time, an inexperienced wheel builder has a tendency to leave a wheel as well loose versus overtightening. If you are intending to truing wheels more than one wheel sometimes, it may deserve purchasing a torque spoke wrench to assist increase your wheelsmithing ability of identifying the proper stress.
The best tool to have when truing dirt bike wheels is patience. It may take you a few hrs to finish your very first wheel. If you're really feeling depressed, walk out and you'll return back a clear head. As soon as you figure it out, you will find yourself wishing to lace up and truing a fresh set of wheels for every old dirt bike you see.
7 Ways To Choose Right Size and Replace Dirt Bike Tires
Decide the total track circumstance including the beginning line
- If the circumstance differ from hard-packed to loose loam, you'll likely will want a versatile tire like Dunlop's MX33 or other brand dirt bike tire.
- For hard terrain, the MX52 is your ideal choice.or other brand dirt bike tire(see column 1 on the below guide chart).
- For soft terrain, mud or sand, Dunlop's MX12 is the tire of option or other brand dirt bike tire
- If the conditions differ from hard-packed to loosened loam, you'll likely will want an intermediate terrain tire like Dunlop's MX33F front & MX33 rear or a combination of hard track front & intermediate back (MX52F & MX33) or option other brand motorcycle tire(see column 1 on the below guide chart).
- If the ground has a mat to it, rutted with soft berms, you probably need a soft terrain tire that will pierce via the loose dirt. Dunlop's MX33 or other brand dirt bike tire(see column 3 on the below guide chart)or is an exceptional selection.
- If the circumstance are strictly soft deep sand or mud, you may think about a specialty tire like the New MX12 or other brand dirt bike tire
- Allow the dominant circumstance determine your option after thinking about the start section.
Don't be fear to mix dirt bike tires patterns front and back to feel even more comfortable.
| Engine | Front | Front Option | Rear | Rear Option | 2.5" Rim | 2.5" Rim |
| 125cc | 80/100-21 | 100/90-19 | ||||
| 250cc | 80/100-21 | 90/100-21 | 100/90-19 | 110/80-19* | 110/80-19** | 120/80-19*** |
| 450cc | 80/100-21 | 90/100-21 | 120/80-19 |
* For Hardpack
**SX Hardpack
***Ultra Hardpack
Pre-Ride Inspection
There are a couple of essential points you must to examine before every ride
- Examine atmospheric pressure prior to every ride.
- Make certain the shutoff stem has actually not spun; if it has, decrease tire and re-set.
- If riding in a rough area or track, ensure to look between the knobs for splits or cuts to the tire carcass.
- Examine spokes currently.
- Make sure rim lock is safely tightened up.
Appropriate Inflation Pressure
Appropriate inflation is vital to the life and performance of your tires. Refer to the below chart for right number.
- Hard Circumstance: Front- 12.5~13.5 psi
- Hard Circumstance: Back ~14 psi
- Intermediate Circumstance: Front- 12.5~13.5 psi
- Intermediate Circumstance: Back~14 psi
- Soft Circumstance: Front-12.5~13.5 psi
- Soft Circumstance: Back-11~12 psi
- Minis:13~14 psi
Changing Your Tires
Follow these steps in removing and installing your new tires.
Dismantling
- Lay the rear wheel sprocket side down and the front wheel brake side up.
- Get rid of the valve core and loosen the rim locks.
- Stand the wheel up and also make use of the flat side of a tire iron to push the rim locks down, breaking them loose from the tire bead.
- Lay the wheel down once again and also base on the tire sidewalls with your feet pressing to break the beads loose from the rim. Occasionally, a little soapy water at the tire/rim joint assists loosen the grains.
- With the brake side of the wheel up, make use of the spooned end of your tire irons and also place them in between the grain and also rim. We suggest placing them on one side of the valve stem or other. Lever individually, functioning your way around the tire in little increments.
- After the very first side is gotten rid of, press the shutoff stem into the rim and pull tube out.
- If your wheel has rim locks, take out them prior to beginning removal of the second bead.
- Remove the 2nd grain by putting a tire iron under the bead of the brake side of the wheel, after that lever the tire bead over the rim and press it off
- Clean the bead location of the rim. Check the rim locks, rubber rim strip or tape covering the spoke nipples areas for damage
Installation
- Install one rim lock, lube one bead of the tire. Lower on the top of the tire and insert one side of the wheel and the rim lock into the bottom part of the tire. Begin levering the first bead on.
- Put the 2nd rim lock if your wheel makes use of two. Prior to mounting inner tube inflate to make sure there wan no damage done throughout removal. Examine the nut at stem area for rigidity and seek fractures in the stem. Leave simply enough air in the inner tube for setting up, so inner tube holds its form.Apply baby powder to the beyond inner tube and inside the tire. This avoids inner tube from chafing in operation.Install inner tube in the tire thoroughly. Starting at the valve stem openings, uniformly position the inner tube inside. Be sure the inner tube is not bunched up in any type of location or aught under the edge locks. Lube the bead with a mild soap and also water option and push a tiny area if it under the rim near the valve stem location. Place one tire iron and begin levering the tire bead on, taking very little bites with each iron. Stick the iron in just far enough past the rim being careful not to capture inner tube .
- With each bite, check that the bead of both sides of the tire is as far down in the well of the rim as feasible.
- After the final bead area is mounted, make certain the rim locks and shutoff valve stem move freely.
- Pump up the tire and also seat both beads. Ought to the beads not seat correctly, do not over-inflate. Re-lube the bead locations with soapy option and re-inflate till seated effectively.
- After the tire is totally blown up, let the air out again after that re-inflate. This permits inner tube to settle inside the tire.
- Tighten up the rim locks and adjust the tire pressure
MX Tire Size Markings
For dirt bike tires, Dunlop changed to the industry tire standards similarly as street tires. However, due to the prior variations in real dimensions, some changes in bike application have actually been needed.
- When motorcycle tire requirements for width, diameter and load capacity were presented a couple of years ago, they really did not include dirt bike tires. Therefore, dirt bike tires differed in dimensions from one factory to another. Many tire factory marked their dirt bike tires with a size designation that pertaining to tread width.
- In current tire standards, the designation for size is really the section width, measured at the sidewall, not at the tread. This has constantly put on street bike tires. A 4.50-18 street bike tire, for instance, would certainly have an area size of 4.50 inch, and also would certainly fit on an 18 inch rim.
- 3.When statistics tires were presented, the aspect ratio was consisted of in the size marking. A 130/80 -18 street tire had an area width of 130mm, and also a height ratio of 80 percent. This means that the height of the tire is 80 percent of 130mm. As previously, the tire fits on an 18-inch rim.
- For dirt bike tires, Dunlop changed to the industry tire requirements likewise as street tires. Nevertheless, because of the previous variations in real dimensions, some changes in bike application have been essential. An off-road machine that formerly fitted a 4.50-18 or 130/80 -18 under the non-standards markings, now fits a 110/100 -18 under the new standards. These tire dimensions share the exact same real measurements. A 130/80 -18 is 110 mm wide in area size and, moreover, the area height is likewise 110 mm or 100-percent aspect ratio. For this reason, a 130/80 -18 under the new standard markings is 110/100 -18.
- With the introduction of 19 inch dirt bike tires, it was needed to decrease the aspect ratio in order to maintain the same outside diameter. To make up for the extra inch in rim size (18 inch to 19 inch) fitted to a 250cc dirt bike as an example, the size would be changed from a 110/100 -18 to a 110/90 -19. The resulting low profile 19 inch tires with much shorter sidewalls have actually offered improved stability performance, while keeping the very same outside tire diameter.
- Building on the success of the 19 inch back tire, In the mid 1990's, Dunlop became the first tire factory to develop wider, lower series dirt bike tires for rear. The innovation in the 110/80 -19 & 120/80 -19 develops a bigger footprint for enhance grip and bump absorption. In the late 1990's, Dunlop introduced a wider 90/100 -21 front tire to enhance the rear tires. In each case, these width, low-profile tires fit on existing standard-size widths, eliminating the requirement to replace rims.
Wide Size Dirt Bike Tire Benefits
- Provides a bigger footprint for boosted grip and improved bump absorption.
- Dunlop technology developed to harness and transmit power to the track field.
- Provides a bigger footprint for boosted traction and enhanced bump absorption. Fits on standard-sized dirt bike rims
Conversion Chart
| Position | Rim Size | Tire Size | To | Tire Size |
| Front | 21" | 80/100-21 | >>> | 90/100-21 |
| Rear | 19" | 100/100-19 | >>> | 110/80-19 |
| Rear | 18" | 100/100-18 | >>> | 110/90-18 |
| Rear | 19" | 110/90-19 | >>> | 120/80-19 |
| Rear | 18" | 110/100-18 | >>> | 120/90-18 |

Close
Edit Option
Close